In this article I am going to describe a modern approach to using the MVP pattern in an Android application. If you are familiar with MVP then still there might be some things here that might be useful.
A long time ago in a galaxy far away… We used the MVP pattern and it was a great way of separating UI interaction logic (or Presentation logic) though ever since ViewModel was introduced with the architecture components, for some, MVP became history with the MVVM pattern taking its place.
About ViewModels
The introduction of ViewModel was pretty much a game changer in the Android developer world. Finally a decent way to represent state for an activity that could survive orientation changes, conceptually locking it into either a Fragment or Activities lifespan.
You may think by using a ViewModel you are doing MVVM however this is an incorrect assumption. If we take a look at the documentation for ViewModel we find:-
The ViewModel class is designed to store and manage UI-related data in a lifecycle conscious way. The ViewModel class allows data to survive configuration changes such as screen rotations.
Instead of seeing ViewModel as a component within the MVVM pattern, it might be best to see it exactly as a useful data storage mechanism for a screen.
A modern approach to MVP
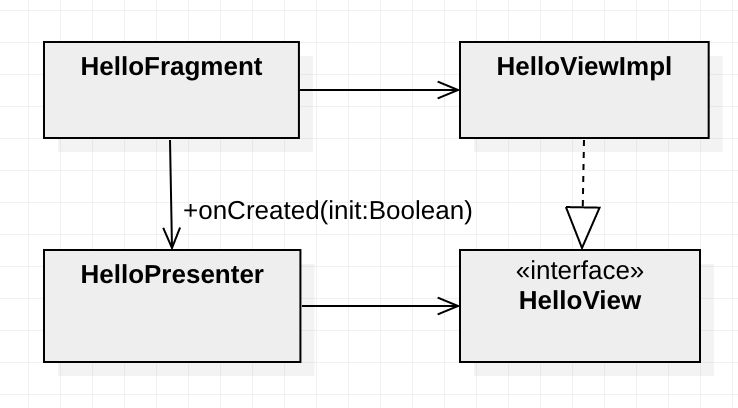
The design approach at the class level is shown in the diagram below.
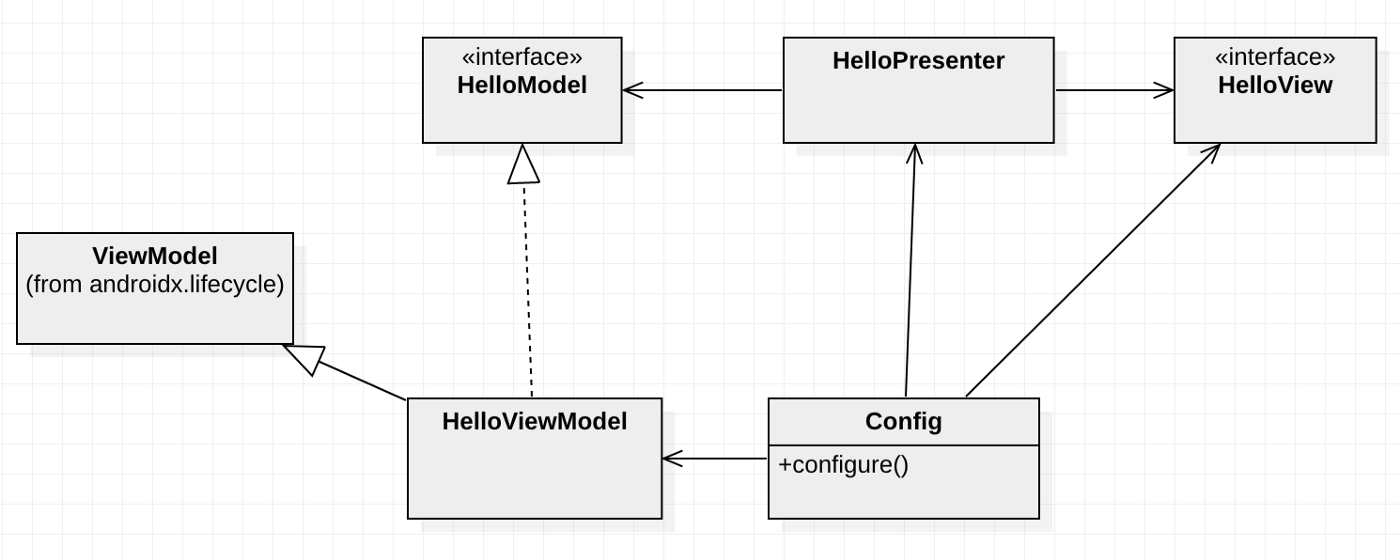
Looking at the diagram I want to highlight some of the important points in the design:-
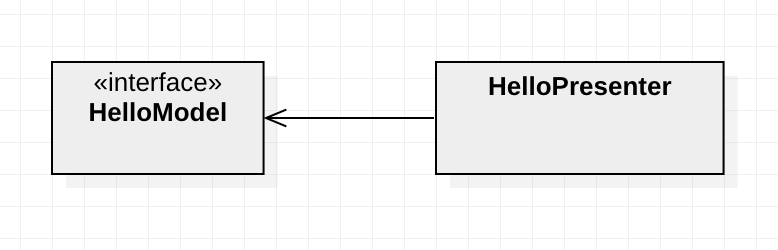
- HelloPresenter has a dependency on HelloModel and HelloView which are both marked with <<interface>> denoting that these are both interfaces.
- The HelloModel interface is backed by an implementation HelloViewModel which in turn extends ViewModel from the Android architecture components.
- HelloPresenter has no idea how the interface HelloModel persists data, it can expose all sorts of data via properties to the presenter including things parsed from intents or data that has been loaded (which I will get onto later by using LiveData<T> behind the scenes as one usually would with ViewModel.
- Config is a separate function whose responsibility is to configure the routing of UI Actions (action flows) and Async Data callbacks (data flows) which I will get into later.
Looking back at the class diagram we see a class Config which is responsible for binding async data flows (via LiveData<T>) from the model to the presenter and UI action flows from the HelloView into the presenter.
The next diagram shows how the pattern is integrated into a Fragment.
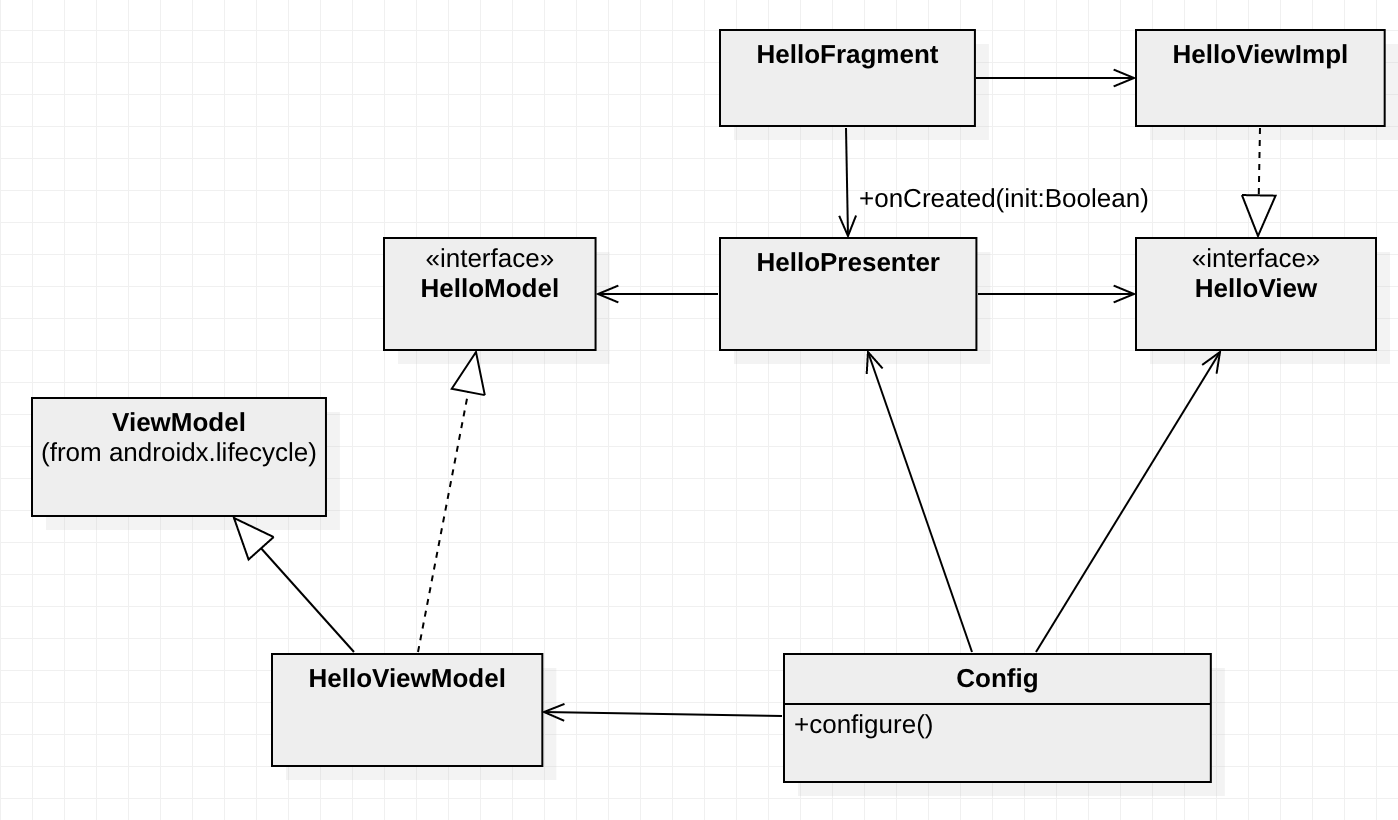
Looking at the diagram we introduce a HelloFragment that is responsible for creating a concrete implementation HelloViewImpl which will take care of interacting with the android views which HelloPresenter can only do through its interface HelloView.
Typically in the MVP that I have used the Fragment would implement the view interface itself, however it is best to delegate view interaction to its own class in this case HelloViewImpl to separate view lookups and bindings from an activity or fragment and keep them clean.
Why an abstract model?
As mentioned previously, instead of allowing access to a ViewModel directly you should use an interface.
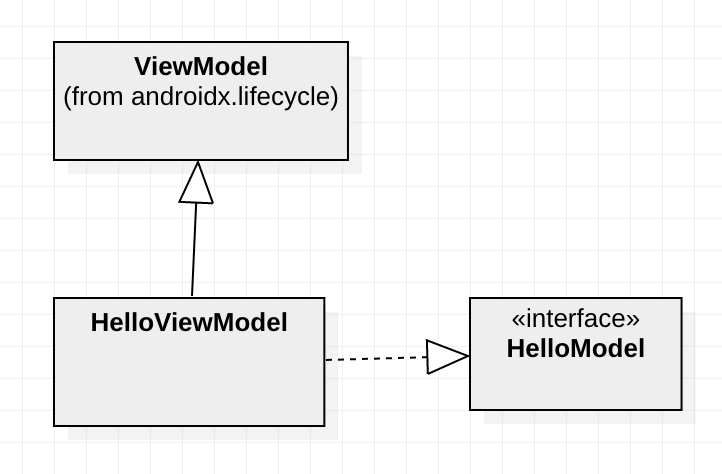
By using an interface we make sure anything (such as the presenter) interacting with our model makes no assumption on the technology employed to carry out the models responsibility. Which is to give access to data which is often contextual to the current screen.
If later some fancier technology comes along to persist screen data, your refactoring becomes more trivial.
Why use an abstract view?
This goes without saying really in the MVP pattern instead of accessing the Android views directly we hide them behind an interface though instead of making the Fragment or Activity implement the view we delegate it to a class that specifically deals with a view hierarchy.
Looking at the diagram HelloViewImpl can be given a view hierarchy from HelloFragment (including passing itself if necessary). Now HelloViewImpl is responsible for doing view look ups, view binding, etc.
HelloPresenter may only interact with the view via HelloView which is typical of MVP patterns.
Implementation
So all this high-level design is insightful however there are some things missing from the design such as data & action flows.
Like all good examples we will create a slightly modified “Hello World” that has a button, which when pushed will generate a new greeting message.
Let’s start out with the abstract stuff and deal with the implementation later, for that we need a View, a Model and a Presenter as follows.
interface HelloView {
    fun updateGreetingText(greetingText: String)
    fun onShowNewGreetingButtonPressed(onPressed: () -> Unit)
}
interface HelloModel {
    fun loadGreeting()
}
class HelloPresenter(val model: HelloModel, val view: HelloView) {
    fun onCreated(init: Boolean) {
        // If this is the first time we loaded,
        // then load the first greeting
        if (init) {
            model.loadGreeting()
        }
    }
    fun onGreetingLoaded(greeting: String) {
        view.updateGreetingText(greeting)
    }
    fun onShowNewGreetingButtonPressed() {
        model.loadGreeting()
    }
}
Looking at the code, in HelloPresenter we have some very simple functionality in onCreated(init: Boolean). Firstly we check init which tells us if this is the first time this screen was loaded (which we will see later how this works) and if it is the first time (init is true) then we ask the model to load a greeting by calling model.loadingGreeting().
Next in the presenter we have another very simple function onGreetingLoaded(greeting: String) which will be called when the greeting has loaded (which we will see how this works later). When this function is called we make a call to view.updateGreetingText(greeting) with the loaded greeting text.
Finally we have a function onShowNewGreetingButtonPressed() which will be called when the user presses on a button (again this will become clear later when we find out how it is called). When the function is called we make a call to model.loadGreeting() which covers the functionality of loading a new greeting message.
HelloModel and HelloView are very simple interfaces, and we will see how they are implemented in the next sections.
The concrete view implementation
To satisfy our HelloView interface we need a concrete view, and to achieve this we create a class HelloViewImpl which implements the interface.
We can use a Fragment but in this case to keep our example simple we will use an Activity.
class HelloViewImpl(activity: AppCompatActivity) : HelloView {
    private val greetingTextView: TextView = activity.findViewById(R.id.greeting_text)
    private val newGreetingButton: Button = activity.findViewById(R.id.new_greeting_button)
    override fun updateGreetingText(greetingText: String) {
        greetingTextView.text = greetingText
    }
    override fun onShowNewGreetingButtonPressed(onPressed: () -> Unit) =
        newGreetingButton.setOnClickListener { onPressed() }
}
In the code snippet above we have the HelloViewImpl which takes the activity as its first argument so it can perform relevant view lookups and actions on those views. It is a fairly simple app so we implement both the functions of HelloView to interact with the view accordingly. For onShowNewGreetingButtonPressed we take the lambda passed as onPressed and just call it when the greeting button is pushed, very simple.
How we integrate this into the activity we will see later, let’s first take a look at the concrete model.
The concrete model implementation
On the other side, we need a concrete model, which we will use the awesome power of the architecture components ViewModel and its best buddy LiveData.
internal class HelloViewModel : ViewModel(), HelloModel {
    val greeting: MutableLiveData = MutableLiveData()
    override fun loadGreeting() {
        greeting.value = greetings.random()
    }
}
private val greetings = listOf(
    "Hello", "Yo!", "Big up!", "Greetings!", "Hiya!"
Looking at the code HelloViewModel we have a live data which we will use to post new greetings to.
We implement the HelloModel interface function loadGreeting() to select a random greeting from a list and post it on the greeting live data.
Configuring action and data flows
Now we have a concrete model and a concrete view and our presentation logic, we can wire things together and create an activity which will make all of this finally work.
Taking a look at the diagram below we can visualise how communication will happen between the Presenter, View and Model.
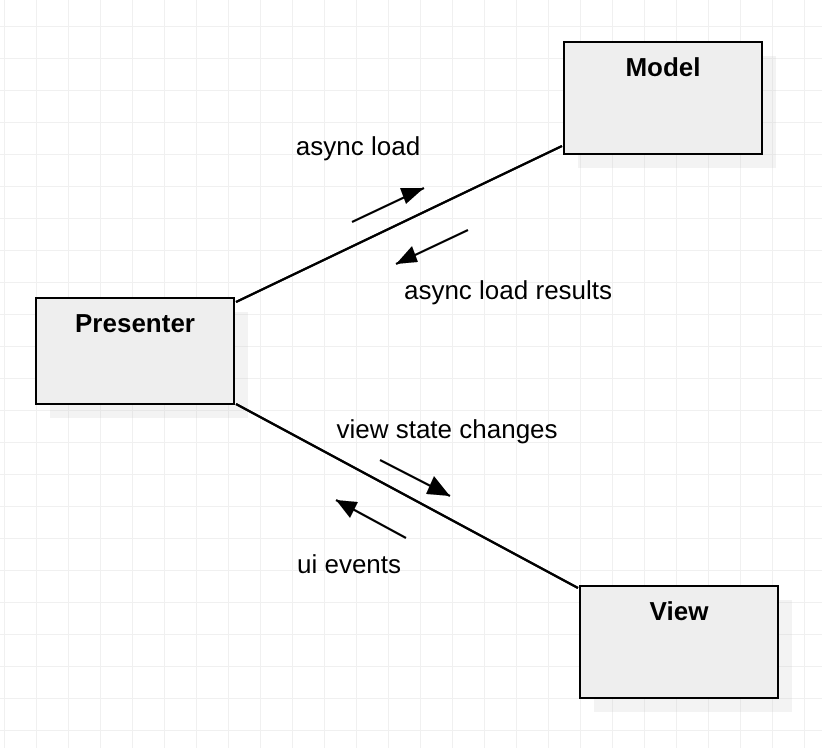
In the diagram we have two way communication between Presenter and Model and the Presenter and the view.
To keep things nice and separate the responsibility of configuration is delegated to a simple extension functionHelloPresenter.configure(…) below.
fun HelloPresenter.configure(lifecycle: Lifecycle, vm: HelloViewModel, view: HelloView) {
    // action flows
    view.onShowNewGreetingButtonPressed(::onShowNewGreetingButtonPressed)
    // data flows
    vm.greeting.observe({ lifecycle }, ::onGreetingLoaded)
}
This function is best kept in a separate file and serves one purpose to connect the model data streams to the presenter (for this we need the concrete model) and for connecting UI event streams from the view.
Integrating into the activity
Finally we can integrate into an activity and the following code snippet shows how this is done. We could use something like Dagger here though to keep things obvious and simple no DI will be used.
class MainActivity : AppCompatActivity() {
    private lateinit var view: HelloView
    private lateinit var presenter: HelloPresenter
    private lateinit var model: HelloViewModel
    override fun onCreate(savedInstanceState: Bundle?) {
        super.onCreate(savedInstanceState)
        setContentView(R.layout.activity_main)
        model = of(this).get(HelloViewModel::class.java)
        view = HelloViewImpl(this)
        presenter = HelloPresenter(model, view)
        presenter.configure(lifecycle, model, view)
        presenter.onCreated(savedInstanceState == null)
    }
}
Following the example in onCreate we create our model (using ViewModelProviders.of) create our HelloViewImpl passing the activity to it so it can perform relevant lookups and bindings, create our presenter and call the configure(…) function on it effectively setting up the action & data flows and finally calling presenter.onCreated(savedInstanceState == null) kickstarting the presenter logic and letting it know that this is the first time this screen was created (leveraging saveInstanceState nullability).
Conclusion
And that is my modern approach to MVP using architecture components and following some basic rules of abstraction.
The full source code for the example is available here
Hope that helps anyone who finds some use in the MVP pattern and is looking for a modern approach to what might be out there already.
A thing to keep in mind is Jetpack Compose is around the corner so using a pattern like this (including MVVM) may become redundant as may some of the architecture components. That being said it is still a great pattern and using a model interface instead of directly integrating with ViewModel could save you some trouble later if you wish to move away from architecture components later.